Analytic Techniques
Setting Up Your Geoprocessing Environment
It can be fun to fool around with GIS -- you can use tools to transform data and examine the results, we can learn a lot this way. But when setting up the parameters of processing tools and developing loads and loads of derived data becomes a bore, we will be happy to know that there are ways to automate chains tasks so that they can be adjusted and repeated without having to repeat each step. We can use these prescribed workflows (known in ArcGIS as Geoprocessing Models) to document our work. This is a wonderful way to share your work and your data with other people so that they can better understand what you did, and even to extend your work. This way of sharing work and advancing knowledge can be very rewarding for individuals, and is especialy important for organizations that can't afford to start from scratch on work that has already been done!
Background and Deeper Reading
- A Brief History of the Harvard Lab for Computer Graphics and Spatial Analysis
- What is Geoprocessing
- An Overview of Commonly Used Tools
- A quick Tour of Finding Tools
- A Quick Tour of Model Builder
- Geoprocessing Tool Reference
Setting Up your Modeling Laboratory

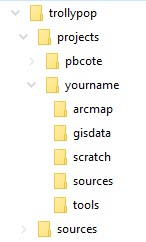
The tutorial Beginning a GIS Database explains a framework for organizing data for a team of collaborators working on a project. The principles described there provide a framework for organizing project data so that many people can share and contribute to a common base of GIS data, each user having their own workspace in the GIS folder. By careful attention to the use of relative pathnames, this entire project directory tree can be worked on by many different collaborators without conflicts developing between different users trying to develop data in the same location. This tutorial explains how to arrange a working directory so that users can develop and share tools that operate on project data, creating result datasets in that user's scratch and data folders.
Set Up your Working Directory
- Create your working directory in the GIS folder of the project dataset.
- Create sub folders for tools, a docs, a scratch folder and a data folder.
Set your Groprocessing Options and Environment
We will make a toolbox that will hold the geoprocessing models that we make. These models will create new data. SOme of the data we create will be intermediate (scratch) layers that may be deleted when the model is through. Other datasets we may want to save when the model is through. The following steps will let us inform ArcMap where we want tour toolboxes to be created and where your scratch and persistent output data will go.
References
Set your Geoprocessing Options
- Go to Geoprocessing>Options
- Check the box next to Overwrite results of geoprocessing options.
- Check the box next to" When connecting elements, display valid parameters when more than one is available.
- After clicking Geoprocessing->Environments->Workspace, set:
- Workspace = your data folder
- Scratch workspace = your scratch folder
- You should set the enmvironemnt variable for Output Coordinate System to tell all your geoprocessing tools to use your preferred, projected cooedinate system for all output data. Teh most important aspect of this is to inform ArcGIS that you want al ldata that is created to use a projected coordinate system that has XY units in your choice of Feet or Meters. It makes no sense to do measurements using data that have native units n degrees of latitude and longitude.
- The Fields environment can be set to uncheck the box to Use fully qualified field names this eliminates a problem that occurs when you join tables. The field names become indeciferable especially if you use shape files for your output format.
Gotchas with Geoprocessing Tools
- Many geoprocessing tools are sensitive to the way that folders and datsets are named. You should have all of your project input and output data on a local hard drive, near the top of the file system. Folder names and dataset names should:
- It is a good practice to save your model before you run it. In case arcmap crashes, you will beable to restart and pick up where you left off.
- Not include any spaces or spacial characters
- Folder and dataset names should never have a numeral for their first character.
- Path names to data should not be too long
- When saving new rasters, you should always use the .img suffix to create an Imagine Image file format.
- There are some rare tools (Focal Statistics is one) that only like to work with ArcGIS GRID datasets. When encountering unexplainable problems, try leaving the .img suffix off.
- If you notice funny things happening where the layer produced by a geoprocciing tool does not change the way that you think that it should, remove the layer form your table of contents and re-run the process to create the layer again.
- SOmetimes an ArcMap .mxd document will become corrupt and cause odd thgins to happen. To check for this, start a very simple project to reproduce the problem in a folder in your c:\temp directory that includes the necessarry data in folders answering to all of the requirements stated above.
Moving On
Now to preactice creating geoprocessing models go chsk out one of the tutorials on geographical analysis. I recommend starting with the Vector Relational Procedures tutorial. And then, on to Common Patterns in Raster Modeling.


