City Modeling
An Urban Design Laboratory
Investigating Urban View Corridors with GIS
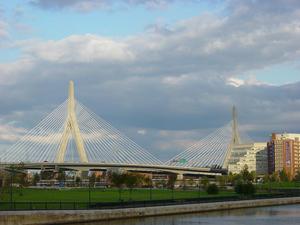
This tutorial explores several examples of how terrain models of various kinds can be used to explore questions of visibility in urban areas. In particular, we consider a large urban design project: Boston's Big Dig, and take a look at some questions of valuable views that may be created and destroyed in the process. The focus of these view studies will be the Leonard Zakem Bridge, Boston's new iconic landmark. For the sake of the questions below, we will pretend that the bridge has not been built yet.
We have questions about what the future might be like after the bridge is built:
- What does our project look like from specific view points?
- What are views from our project?
- What are the places on the ground that could see, or be seen from specific places in our project?
- Among places with a view, can we systematically characterize which views are comparitively good
- Which of these places has their view of the project obstructed?
- What is blocking the view between specific places and our project?
- How can we define a height regulation to protect key view corridors?
Download the Sample Dataset
- Click here to download the demo dataset Then unzip its contents into c:\projects and then open the documents: viewshed\work\arcmap\docs\arcmap.mxd and arcglobe.mxd in ArcMap and Arcglobe version 10 or later.
References
The big ideas in this tutorial relate to a viewpoint on Spatial Modeling for Decision Support. The technical bits of the tutorial assume knowledge of fundamentals of handling spatial data in ArcMap and Geoprocessing and Basic Raster GIS. The following documents may be useful for details of some of the techniques that are introduced in this tutorial.
- The tutorial, Beginning a 3D model with GIS Data, provides a Metro-Boston dataset and a procedure for preparing a 3d GIS model sutible for the exploration described below.
- This conference paper by yours truly introduces some useful terms and techniques
- An Article in GeoWorld Magazine about View Corridor Studies in Belfast
- A Slideshow about my Belfast View Studies with video!
- Using ArcGlobe
- Using ArcScene
- Importing True 3d Models into a Geodatabase
Explore the Data
Much of the information that enables our compilation of geometrically correct landmark models comes from a LIDAR survey of the Boston Area that was flown by the Massachusetts GIS in 2001. This survey amounted to the 3d scan of the city that collected the heights of everything on the ground at a resolution of 1 meter. A portion of this survey was turned into vector-based building roofprints each having attributes for their roof height and footprint elevation. MassGIS has also made available color orthophotography for the region at a pixel-resolution of one-half meter. In addition to this, we also use the MassGIS 1:5000 digital elevation model, in which the height of the terrain is given for each 5 meter cell. Our dataset also includes several 3d models of boston landmarks that have been compiled from various sources including the Central Artery Tunnel authority, the Boston Redevelopment Authority. The aerial photo comes from ArcGIS On-Line.
The Models
Your ArcMap project has a toolbox named View Studies that has been created for this tutorial. If the toolbox does not open up automatically when you open the arcmap document, you can add it by right-clicking on your Tools window and adding the Visibility Tools from the Work/ArcMap/Tools folder within the tutorial dataset. If you right-click on any of these models and choose Edit you will see the various GIS procedures that we will examine in this tutorial. The yellow boxes are geoprocessing procedures, You can open each of these and take a look at the help documentation for each of them. The models in their entirety or simply right-click on any of the yellow boxes and choose Run to run the models step-by-step.Examining Specific Views from a Human Perspective
In using GIS data to examine views, the most straight-forward approach is to use the GIS to simulate a 3d scene and to simply visit different places in the model to see ewhat they look like. This can be done using the ArcGlobe project provided with the tutorial dataset.
 |
Roll over blue text to see image
|
- In your ArcGlobe project, use View->Bookmarks to zoom to the various bookmarks.
- Flick the Observer Points layer on and off to see the viewpoints.
- Flick the roofprints on and off to see what the view would be like with no man-made obstructions.
Investigating Wholesale Views from Cartographic Perspective
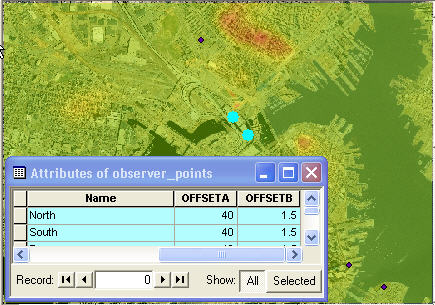
The human perspective is very useful, but like walking around and just looking for specific views, it is difficult and costly to discover view opportunities this way. The Viewshed Tool in your 3d analyst toolbox, under Raster Surface, is useful for discovering what areas on the landscape are visible form specific points. In this, we take advantage of the reflexive nature of views -- If you can see me, I can see you (in the general case) so, if we place a couple of viewpoints about half-way up the spires of the bridge then we can have a map of all of the places that have a view of a decent portion of the bridge.
The first view study will use the plain elevation model that represents the bare terrain. This will show us the places with potential views if there were no buildings present. The second view study will incorporate the building heights into the terrain model. Comaring these two viewshed maps will help us to find places where good views exist, but also may help us find places where the viewe of the bridge might be easily improved by altering or removing or down-zoning a building or two.
 |
Roll over blue text to see image
|
References:
Performing these viewshed analyses and combining the buildings with the terrain model requires sveral combinations of procedures. To simplify things we have scripted these workflows into geoprocessing models that have been included with your project in the Visibility Toolbox. This toolbox should be open in your Geoprocessing tools panel. If it is not in your toolbox already, you can find it in the folder work/arcmap/tools/visibility.tbx.
Adding Buildings to the Elevation Model
YOu can run the viewshed analysis ufing an elevation surface that represents the bare earth. And this may be a useful model if you are willing to go to any length, including demolishing buildings to create a view to the bridge. But may people might argue that a more realistic viewshed analysis would have to take buildings into account. Lets add the building heights to our surface model and explore how this might affect our understanding of view corridors.
References:
- Polygon to Raster
- Mosaic Raster Datasets used to overlay the buildings rater over the elevation model.
Alternative 1: Use a ready-made Geoprocessing Tool
>- In your ArcMap document, right-click the Add Bldgs to Elev model and choose Edit.
- Observe how this model adds the building heights to the terrain model.
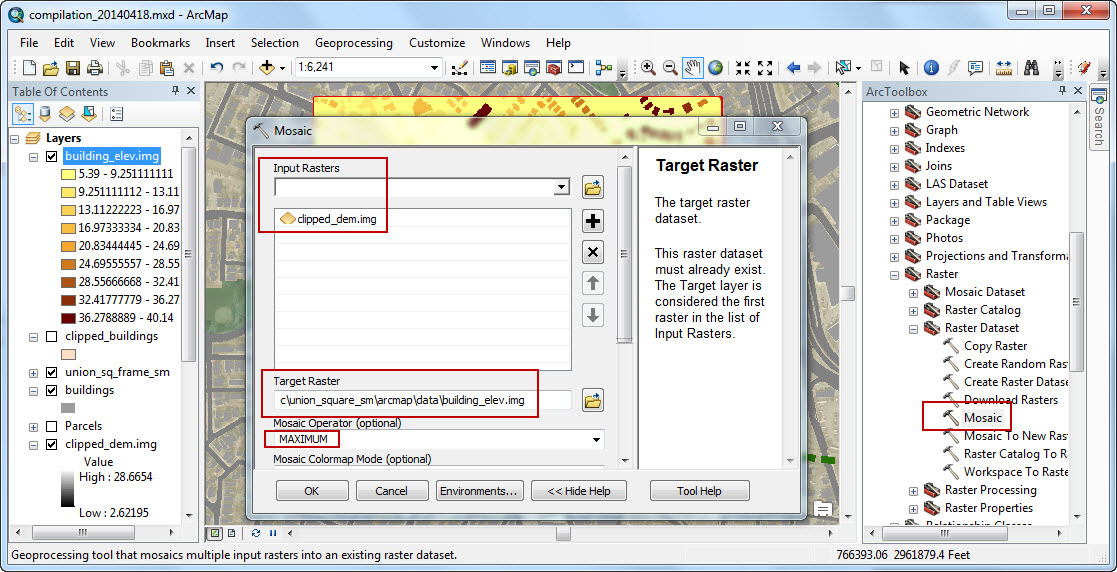
- You may need to adjust the Mosaic Operator setting. Set this to Maximum which causes the new raster to choose the input cell with th highest value for determining the value of the cells in the output raster. Choose run entire model from the Model menu to run this model.
- Edit the visi-calc model and observe how this model selects the North and South observation points on the zakem bridge. And then casts viewsheds from these points. Run this model.
- Take a look at the value attribute table of your new Bridgeview raster layer.
Alternative 2: Do It with the Ad-Hoc Method
If my model is not working for you, then you can always just use the tools on their own. Here are the too references:
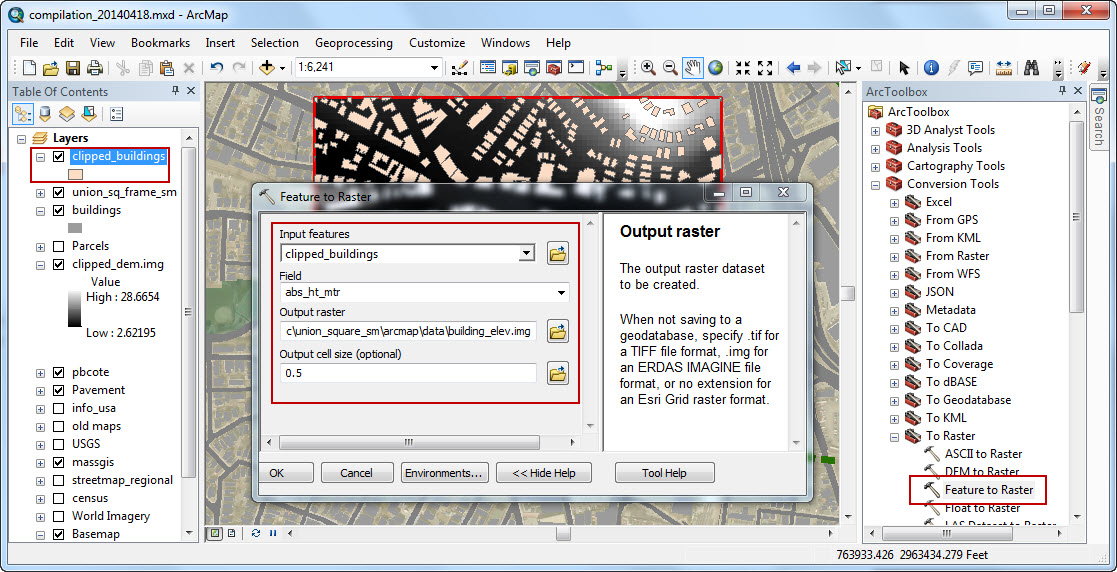
- The Feature to Raster Tool from the Conversion > Raster toolset. Here is a Screenshot showing how I have filled out the feature to raster dialog.
- The Mosaic Tool from the Data Management / Raster / Raster Dataset toolset. Here is a Screenshot showing how I have filled out the mosaic dialog.
Back to the Human Perspective
Of course, we can derive all sorts of new information from existing data, but we should never put our confidence in this new info without thinking critically about our inputs and our processes. We may even want to check our result in the field (of course, we should get permission before actually removing any existing buildings!) Before going into the field, we can check our results graphically using the 3d GIS model.
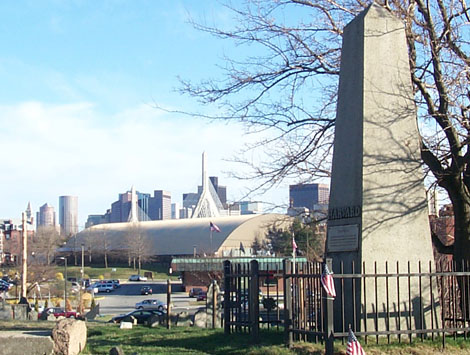
It is nice to go out in the field. When I was exploring the data in GIS, I looked for a public openspace that might have an opportunity for a better view of the bridge. I found this little patch of green in Charlestown that seemed to have its view of the full spires blocked by a single building. It not being far from my house, and also a nice day, I decided to load up mu camera with batteries and ride over on my bicycle. I found the place with an iron fence around it. The sign at the gate announced that it was the first burying ground in Charelstown, established in 1630. The stone carving here is excellent!. At the top of the hill is an obelisk, mirroring the Bunker Hill Monument, and also the spires of the Zakim Bridge. Inscribed HARVARD, it was erected to commemorate the life of John Harvard, which, accoring to the plaque, ended in Charlestown. In keeping with the Harvard enigma that was continued with the statue of Harvard in the Yard of the university that he didn't actually found -- which is not actually John Harvard, because there was no record of what this man looked like -- this is not actually John Harvard's grave, because nobody knows where his body actually ended up.
 |
|
With maps of the actual and potential views we can find those areas |
